
Last Updated on: 14th January 2026, 03:40 pm
The Leopard Trail has become one of South Africa’s most popular multiday hiking trails. The hike follows a circular route and takes place over four days and three nights. It is usually fully booked well in advance, but cancellations do become available.
Many hikers extend the Leopard Trail by adding on the Cedar Falls day hike.

Where is the Leopard Trail?
The Leopard Trail is located in the Baviaanskloof (Dutch for “Valley of Baboons”) in the Little Karoo in the Eastern Cape province.
“The Baviaanskloof is a narrow valley, just under 200 kilometers in length, bounded by two mountain ranges: the Baviaanskloof Mountains on the north and the Kouga mountains on the southern side.” [1]
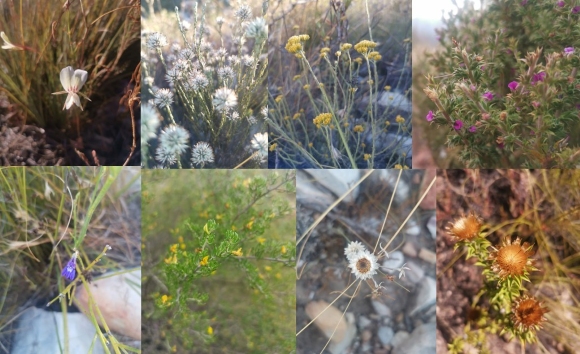
The area has a striking, rugged beauty – the photos speak for themselves.
Leopard Trail logistics
The Leopard Trail is a slackpacking hike that is managed by Go Baviaans. They have a very good website: https://gobaviaans.co.za/, so I won’t repeat details in this post.
You pack your gear and food into provided boxes which are transported from camp to camp.

Facilities at each camp:
- farm-dam-style pool which is great for hot days
- large catering hut
- firepit
- three sleeping huts with two double bunk beds in each
- convenient washbasin in each hut
- four showers with hot water
- two flush toilets


Our Leopard Trail Conditions
• We hiked in the first half of March. Owing to the micro-climate it is difficult to know exact temperatures but based on a reliable forecast we can assume: Day 1 31 deg C, Day 2 31 deg C, Day 3 31 Deg C and Day 4 24 deg C.
• No rain
• There was often a light breeze which helped moderate the heat somewhat
• We filled our water bottles at the huts as there was little water along the way and the water that was there would have needed to be purified before drinking.
Please note that all our distance and elevation gain measurements include the official detours.
Day 1: Base Camp to Camp 1
Official Distance: 9.7 km
Official cumulative elevation gain: 328 m
Official Time Estimate: 3 – 5 hours
Our Day 1 measurements:
Distance: 10.0 km
Cumulative elevation gain: 333 m
Moving time: 2:38
Elapsed time: 4:28
Day 1 is a short hike which allows you to start at lunchtime if that suits your travel arrangements.
We stayed over at Cedar Falls Base Camp accommodation the night before and packed our boxes there.
We had a trail briefing at the Cedar Falls Base Camp reception and were given maps and an information guide booklet as well as a satellite phone for emergencies.

The trail commences with a +- 150 m ascent up Kickstart Hill and then levels off for easy walking on the plateau.

At about 5 km, there is a turn-off to Gabriel’s Pools. Apparently Gabriel’s grave is to the left of the Gabriel’s Pools sign but we missed it.


There was water in some of the pools but the waterfall was not flowing. The non-flowing water did not tempt us to swim though other hikers were not as fussy. We relaxed for a long time in the shade of the kloof.
We thought there may be something of interest to see along Gabriel’s Loop but after we realized that this was not an official detour, we turned back and returned to the main trail.

The trail descends gently into a valley with more vegetation and some shade opportunities. We crossed the rocky riverbed several times before arriving at Camp 1 which is in a lovely hilly cul-de-sac.

The huts are first-rate but have not been designed for the heat; they felt like ovens until it cooled down in the evening. The sliding doors must not be left open when unoccupied to prevent mice and snakes from entering.
It was extra special to be able to lie in bed and see the stars at night.
Tip: Each day, the boxes are dropped off and stored at the camp catering hut. It is useful to have a light bag to carry your clothes and toiletries to your sleeping hut which is a little distance away.

Day 2: Camp 1 to Camp 2
Official Distance: 18 km
Official cumulative elevation gain: 681 m
Official Time Estimate: 5 – 8 hours
Our Day 2 measurements:
Distance: 16.2 km
Cumulative elevation gain: 633 m
Moving time: 5:05
Elapsed time: 6:58
We left shortly after sunrise to gain maximum benefit from the cooler part of the day.

The trail doubles back for about 1.5 km to where it splits – Day 1 inbound and Day 2 outbound. It continues up the Rhebok Valley on a fairly level path. When we hiked, the Cedar View detour was no longer available as an option and is now permanently closed. I wonder if this accounts for the shorter trail distance on Day 2.
We heard and saw baboons in the distance.

We were still in shade when we started ascending more steeply. The main ascent to the first saddle is about 160 m and the second saddle about 40 m.


Reflection Pools is a good place to stop for a mid-morning snack but is only at +- the 9.4 km mark. Reflection Pools is directly above Gabriel’s Pools.

It was very hot as we walked the next few kilometres. We resorted to sitting flat on the ground next to bushes for some shade when we wanted a short rest.

Towards the end there is a shortcut option to Camp 2 which avoids the ascents of Labyrinth Hill and Eagles View (though I think “Nasty Hill” is a more appropriate name 😉). After descending Labyrinth Hill be sure to follow the Leopard Trail markers that will lead you to the path up Eagles View.


Day 3: Camp 2 to Camp 3
Official Distance: 22 km
Official cumulative elevation gain: 730 m
Official Time Estimate: 6 – 9 hours
Our Day 3 measurements:
Distance: 19.6 km
Cumulative elevation gain: 588 m
Moving time: 6:24
Elapsed time: 9:09

We set off early again on Day 3, wanting to get over the three ascents before it got too hot. As it turned out, we had a good amount of shade.

The main ascents are as follows:
- Honeybush Hill: 150 m (if measured from the 3 km mark)
- Inconvenient Truth: 140 m
- Ain’t So Bad: 100 m
There are a lot of loose stones on the descents, which slowed me down.
Early in the day, we enjoyed watching klipspringers on a rocky slope opposite us.

I loved the variety of plant-life: “… The Baviaanskloof is part of the Cape Floral Region World Heritage Site. It is a meeting point of several different ecosystems, with almost all of South Africa’s eight biomes represented, making for an exceptional diversity of species, including many endemics.” [2]

Draaipunt is at about 9.3 km. We were a bit confused here as the detour to the small kloof was not marked. You turn right off the path and then walk in the riverbed upstream. We found some shade and a small pool of water, but I am not sure if that was the kloof or if it was a little further.

Continuing on, the vegetation changes with larger plants present. The lovely Kasey’s Kloof provided some shade once in a while as well as the odd pool of water. The trail crosses the riverbed and / or follows short sections of riverbed many times. This makes for uneven conditions underfoot. I cynically contemplated a name change to the Rocky Trail.


Day 4: Camp 3 to Base Camp
Official Distance: 13 km
Official cumulative elevation gain: 648 m
Official Time Estimate: 3 – 5 hours
Our Day 4 measurements:
Distance: 12.8 km
Cumulative elevation gain: 536 m
Moving time: 3:54
Elapsed time: 4:59


The day starts with a walk along Birdsong Valley and then a narrow kloof. We did indeed hear more birds here than elsewhere along the trail.


The ascent of Fond Farewell starts at +- 4.2 km. The ascent is about 250 m with a false summit or two. The views from Fond Farewell are spectacular and my favourite views of the trail.

From there you walk along the plateau and need to be aware that The Cauldron (two small valleys) can get very hot in summer.
You then descend into the Cedar Falls Valley for an uninteresting 1.5 km walk back to Base Camp.
The Cedar Falls Base Camp reception area has ablution facilities where hikers can shower after the hike.

Cedar Falls day hike – Baviaanskloof
Official Distance: 10 km
Official Time Estimate: 4-6 hours (including lunch and swim stops)
Our measurements:
Distance: 8.9 km
Cumulative elevation gain: 180 m
The cliffs obstruct the gps signal resulting in incorrect measured elevation gain data. The elevation gain was therefore estimated as follows:
1025 m (Cedar Falls contour) – 865 m (Base Camp contour) = 160 m, plus 20 m for extra gains.
Elapsed time: 4:24
The Cedar Falls day hike is an out-and-back trail that leads to remote kloofs with clear pools and culminates at the wonderful Cedar Falls waterfall and pools. It is a fun mini adventure which is a popular add-on for hikers before or after the Leopard Trail.

The hike starts at the Cedar Falls Base Camp and initially follows a jeep track.

In the valley, the trail crosses riverbeds and flowing streams (depending on water levels) multiple times. When we were there, the vegetation was very overgrown in places.

After about 3.7 km, you enter the narrow Cedar Kloof and continue straight ahead to the first pool that requires swimming. (Go Baviaans says that that this pool is about 10 m long.)

At the edge of the pool, we changed our shoes and some clothes and stored our daypacks. Remember to bring a waterproof bag with you if you want to keep any items dry. We walked into the water and then needed to swim from about a third of the way into the pool.
From here onwards, the trail crosses other pools and river sections that we sometimes walked through. We saw frogs, crabs and small fish in the water. There is a fair amount of rock hopping and rock clambering.
Footwear that is suitable for walking through water, swimming, and rock clambering is highly recommended. I was very happy with my water shoes. Our group used a range of footwear: water shoes, old running shoes and sports sandals.

Further along, you reach the second, longer pool that requires a swim. (Go Baviaans says that that this pool is about 15 m long.)


Once you reach Cedar Falls, you need to go up a rather smooth rock ramp before climbing into the upper pool. Two of our team said that the climb into the pool was slippery so I regrettably decided to give it a skip. We heard that another hiker slipped and cut her elbow open at that spot two days later.
In 2025, a temporary ladder was installed at the main falls. Go Baviaans has advised that it will be replaced with a custom-built ladder at a later stage.

You then return the same way.
It is useful to have a small towel to dry your feet before changing back into your hiking shoes. We hiked on a hot day, so it was no problem to let our clothes dry as we walked.

References:
- https://www.baviaansklooftourism.co.za/articles/the_baviaanskloof_area – retrieved March 2024
- Euston-Brown, D and Kruger, M (2023). Plants of the Baviaanskloof
8 replies on “Leopard Trail – Baviaanskloof”
Thank you so much for sharing this link with me following my question on the FB group.
It is very informative and super helpful.
Thank you for your kind words Janet.
3 weeks to go !!! thank you for the detailed information on each day from start to finish. Looking so forward to this hike. End May/ early June hopefully not hot and more pleasurable climbs in moderate conditions. Your photographs are enticing! Thank you
Thank you Lea – I am sure you will gave a great hike!
Awesome and hugely helpful! Makes me even more excited for our hike in November. Really lovely, thank you!
Thank you Shelley😊. Wishing you a wonderful Leopard Trail hike in November.
An excellent account of what must be one of South Africa’s most beautiful hikes, with stunning photos. Truly beautiful!
Thank you Sue👍🏻